Armoring: Coat of Plates Project - Work Shop Sessions 1&2
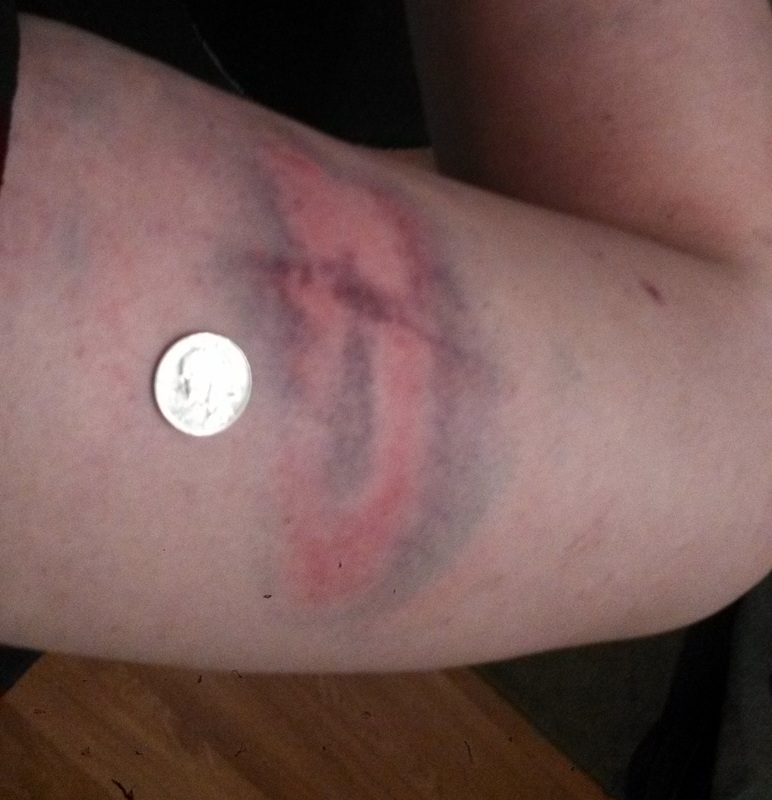
Getting beat with a 2” stick of rattan is not the same as getting love tapped with a piece of foam, potentially following Dagorhirrim. The SCA makes it feels more like a baseball bat, with slightly less speed, and just as much force. Blows take the wind out of you, as they should, and leave a lasting impression on impact. This shot on my left thigh was through leg armor.
My take on sparring, melee fighting, and aggressive combat reenactment in general, is less about the associated Glory that comes from a solo or group victory: there is so much more going on than that. I strive for an improved balance between pure primal reaction and a better understanding of physics and its manipulation. For me, it begins with the ever-evolving skill of perceived sensual and spatial awareness, crosses the physical endurance barriers, plays with the art of motion, and ends with the energy dance between duelists.
I try to remain humbled by the fact that I am currently fighting at the grace of others (exploiting spare armor bits donated by those who no longer need them, desired by other potential heavy trainees that need equipping, protected by someone else’s shield until I can locate and trade for the resources to craft my own). Their generosity does not go unnoticed or taken for granted. I am aware and grateful to and for it at all times. In addition to this, there is only so much loaner armor can do for proper coverage. Most plates are bulky on my frame, inhibit movement, and steal your power through contact friction and weight, while others don't cover enough and leave vulnerable areas of your body open to devastating shots.
I seek improved protection and independence with my own personalized kit, in color, style, and size. Recently the path has seen fit to cross the time, materials, and knowledge to do so, all in one place.
I am fortunate enough to know a cold working blacksmith at Journeyman skill level. With his knowledge, previous experience, equipped shop, and instruction, my hands are able to construct a personally fitted coat of plates, in the color and style desired. A shout out to Cliffside Armoury, located in North Evans, NY. I would have had significant difficulties accomplishing this task at its worth, while obtaining the knowledge, tools, and entry level blacksmithing experience to do so without his aid.
The following is an account of my journey through the armoring process in conjunction with a step-by-step analysis of how it was done. Please feel free to adapt this process for your own potential armor upgrade and revel in the satisfaction that comes from accomplishing tasks with the sweat of your brow, the burn of your muscles, and the craft of your own two hands.
Why a Coat
My choice to construct a coat of plates has nothing to do with time period association, but rather more about how the design will meet my requirements.
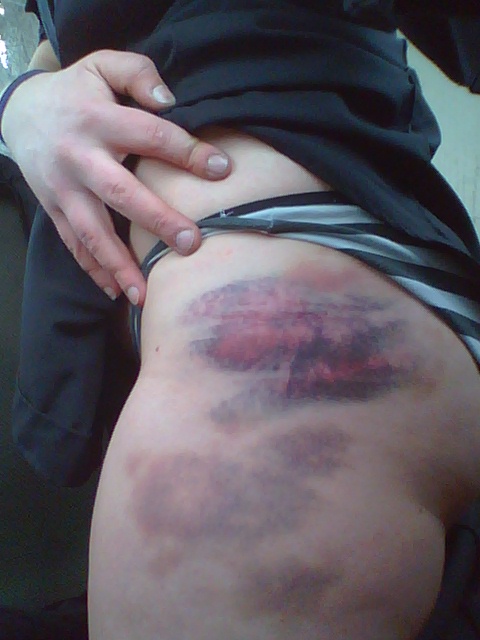
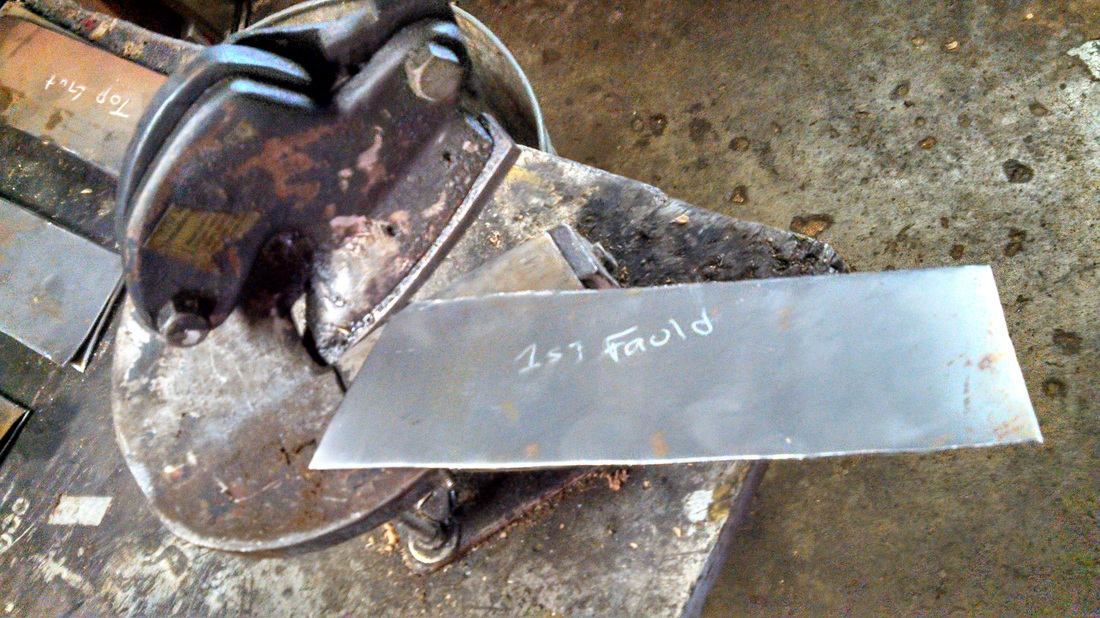
The faulds are designed to cover the previously targeted hip slot, that opens up when I fall for moulinets in addition to glute protection warding off any legitimate ass beatings from a lower targeted wrap shot. Sad story to say I fell for the same moulinet shot four times the practice this photo was taken and twice the previous week. All swings accounted for in stripes.
I try to remain humbled by the fact that I am currently fighting at the grace of others (exploiting spare armor bits donated by those who no longer need them, desired by other potential heavy trainees that need equipping, protected by someone else’s shield until I can locate and trade for the resources to craft my own). Their generosity does not go unnoticed or taken for granted. I am aware and grateful to and for it at all times. In addition to this, there is only so much loaner armor can do for proper coverage. Most plates are bulky on my frame, inhibit movement, and steal your power through contact friction and weight, while others don't cover enough and leave vulnerable areas of your body open to devastating shots.
I seek improved protection and independence with my own personalized kit, in color, style, and size. Recently the path has seen fit to cross the time, materials, and knowledge to do so, all in one place.
I am fortunate enough to know a cold working blacksmith at Journeyman skill level. With his knowledge, previous experience, equipped shop, and instruction, my hands are able to construct a personally fitted coat of plates, in the color and style desired. A shout out to Cliffside Armoury, located in North Evans, NY. I would have had significant difficulties accomplishing this task at its worth, while obtaining the knowledge, tools, and entry level blacksmithing experience to do so without his aid.
The following is an account of my journey through the armoring process in conjunction with a step-by-step analysis of how it was done. Please feel free to adapt this process for your own potential armor upgrade and revel in the satisfaction that comes from accomplishing tasks with the sweat of your brow, the burn of your muscles, and the craft of your own two hands.
Why a Coat
My choice to construct a coat of plates has nothing to do with time period association, but rather more about how the design will meet my requirements.
- First of which: I still plan on attending Dagorhir fighting events, and this steel plated coat should pass as torso armor until I can find the proper leather tools and material to construct a more personalized leather kit for Theowyn's Dagorhir Shift.
- Secondly: I do not wish to be a burden or rely on a second pair of hands to strap myself in armor whenever I fight. Therefore, a front closing coat allows me to remain independent and armor myself without the aid of another.
- Thirdly: The coat covers all the problematic SCA shot areas: Front Upper and Lower Torso, Kidneys, Ribs, and additionally contains four separate faulds that allow for easy movement and 360 degree coverage from lower kidney to mid thigh.
The faulds are designed to cover the previously targeted hip slot, that opens up when I fall for moulinets in addition to glute protection warding off any legitimate ass beatings from a lower targeted wrap shot. Sad story to say I fell for the same moulinet shot four times the practice this photo was taken and twice the previous week. All swings accounted for in stripes.
Pre-Shop Time Prep List
Rather than using the suggested method of buying pre-dyed cowhide, (of an unforeseen color, at whatever price, plus shipping, then waiting for it to arrive) I stopped at JoAnn Fabrics and picked up 2.5 yards (in case double thickness was required) of 1/16” upholstery leather. Come to find out, only one layer was needed.
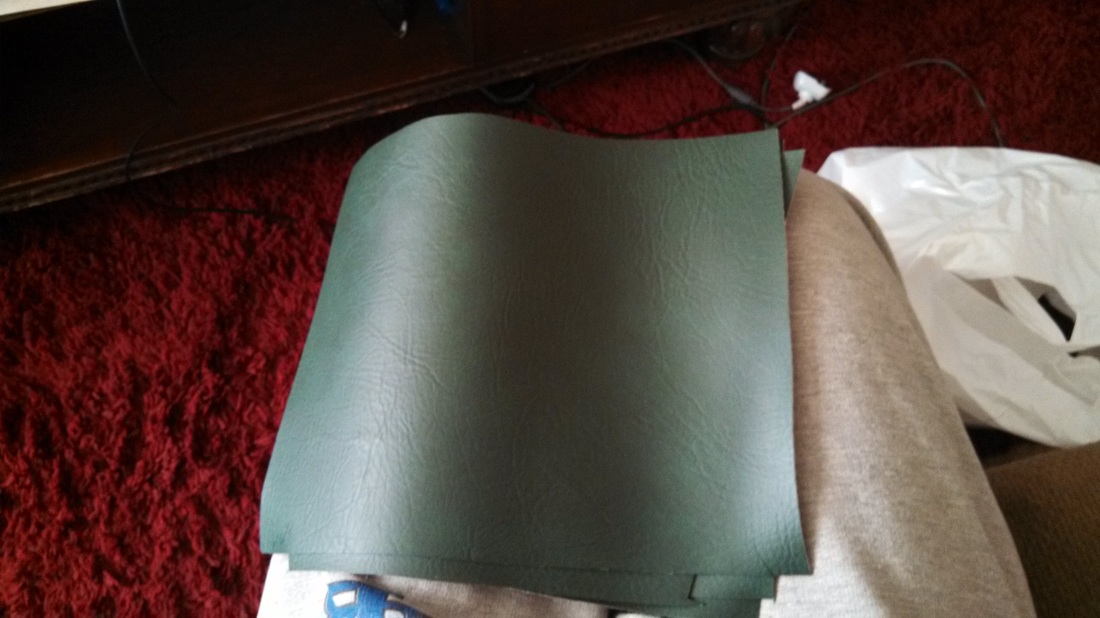
Theowyn is on all levels a woodland dweller, and I would like to somehow carry this fact over into the SCA. Thus her armor is designed to reflect and blend into that color palette. A dark green dissolving to black base material was to provide the exterior of the coat.
Total price: $44 with plenty of leftover material. Time to acquire: Instantaneous. Alterations: None
- Leather Coat Material
Rather than using the suggested method of buying pre-dyed cowhide, (of an unforeseen color, at whatever price, plus shipping, then waiting for it to arrive) I stopped at JoAnn Fabrics and picked up 2.5 yards (in case double thickness was required) of 1/16” upholstery leather. Come to find out, only one layer was needed.
Theowyn is on all levels a woodland dweller, and I would like to somehow carry this fact over into the SCA. Thus her armor is designed to reflect and blend into that color palette. A dark green dissolving to black base material was to provide the exterior of the coat.
Total price: $44 with plenty of leftover material. Time to acquire: Instantaneous. Alterations: None
- Metal Plate Material
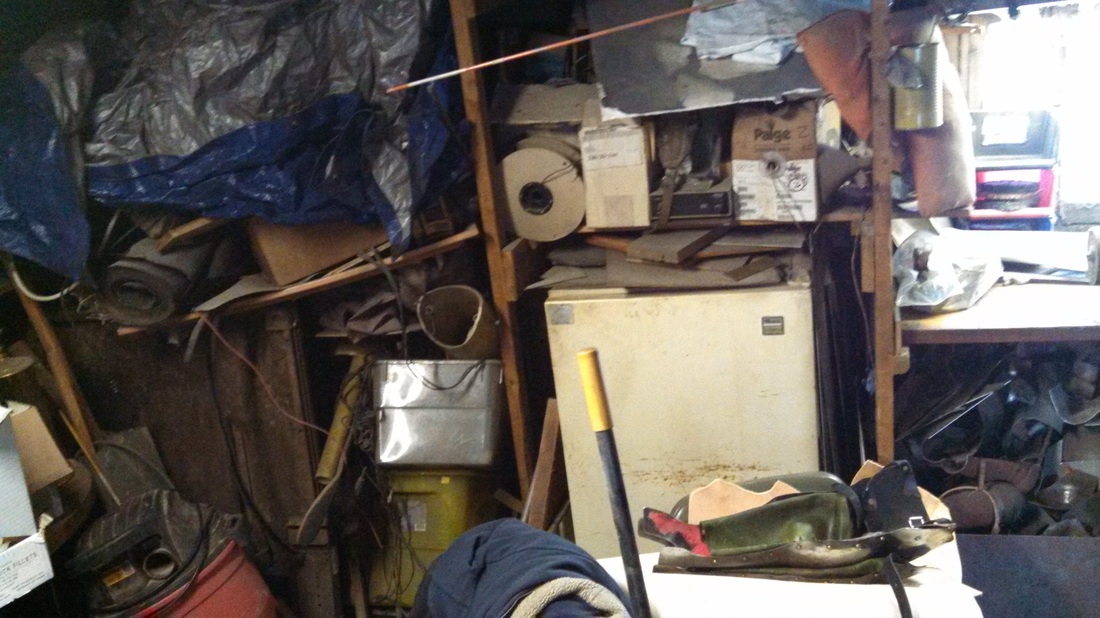
(The metal plating is stored next to the right side of the fridge. I will refrain from posting the rest of the before pictures of this shop to save the reputation of the armorer. )
Constructing the Coat
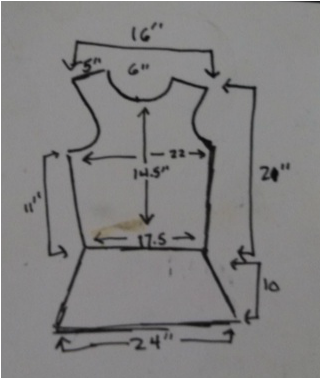
Measurements were taken at the following areas: Hips, Chest, Distance to Navel, Shoulder Width, Sternum to Shoulder, Sternum to Navel, Sternum to Bottom, Bottom to Armpit, and the distance Across the Chest.
A scaled two-dimensional sketch is drawn to conceptualize the measurements for pattern creation. With a ruler and a marking implement, a pattern is measured and drawn on to the back of the upholstery material. An inch of material was added to all seamed sides to account for seam thickness, plating, and potential gambeson fitting. The front torso panel and both front fauld panels were flipped and traced, to save additional measuring time. DON’T FORGET TO FLIP the panel over; else you will have identical panels that cannot properly sew together.
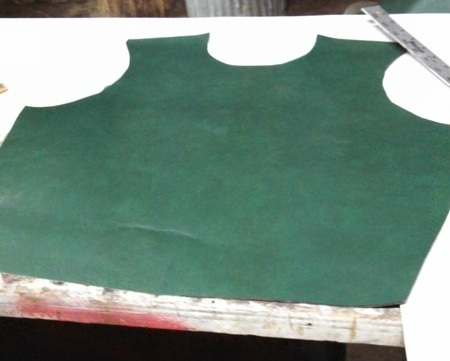
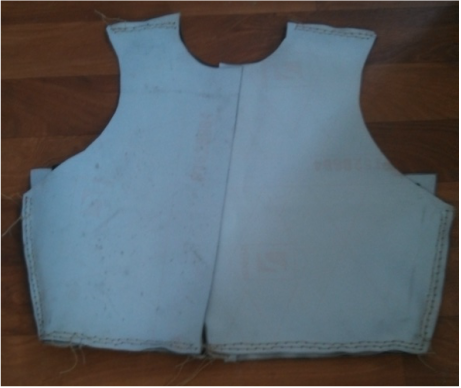
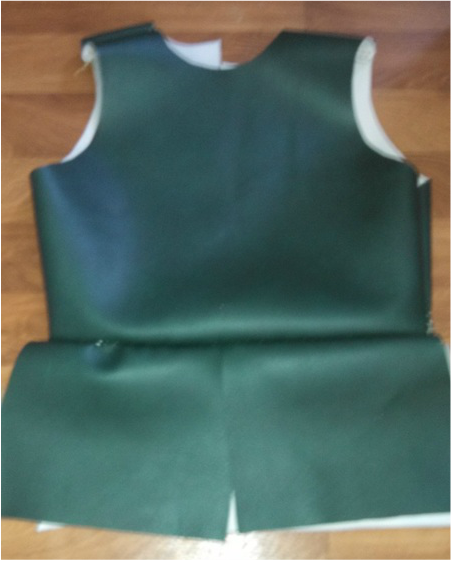
The resultant panels include: one back torso piece (pictured), four faulds, and due to the closing design, two front torso panels. No mathematically correct method was used to measure the arm/neck holes. They were simply drawn on and adjusted later upon duct taping the seams together for a quick in shop fitting. Time to complete: 1.5hrs
A leather punch was used to knock holes into all future seams. Care was taken to ensure the panels are lined up flush and exterior side inward before punching the holes. This greatly speeds up the stitching process. The seams are sewn together using a saddle stitch with reinforced wax-coated string.
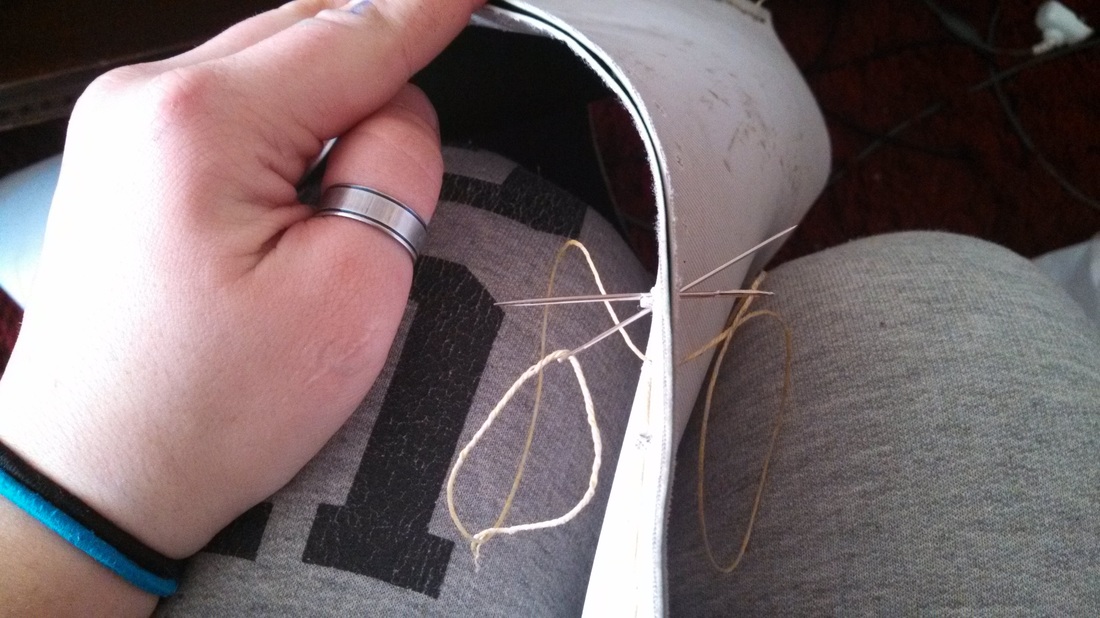
It takes twice the time but, each seam is double stitched to guard against extensive ware.
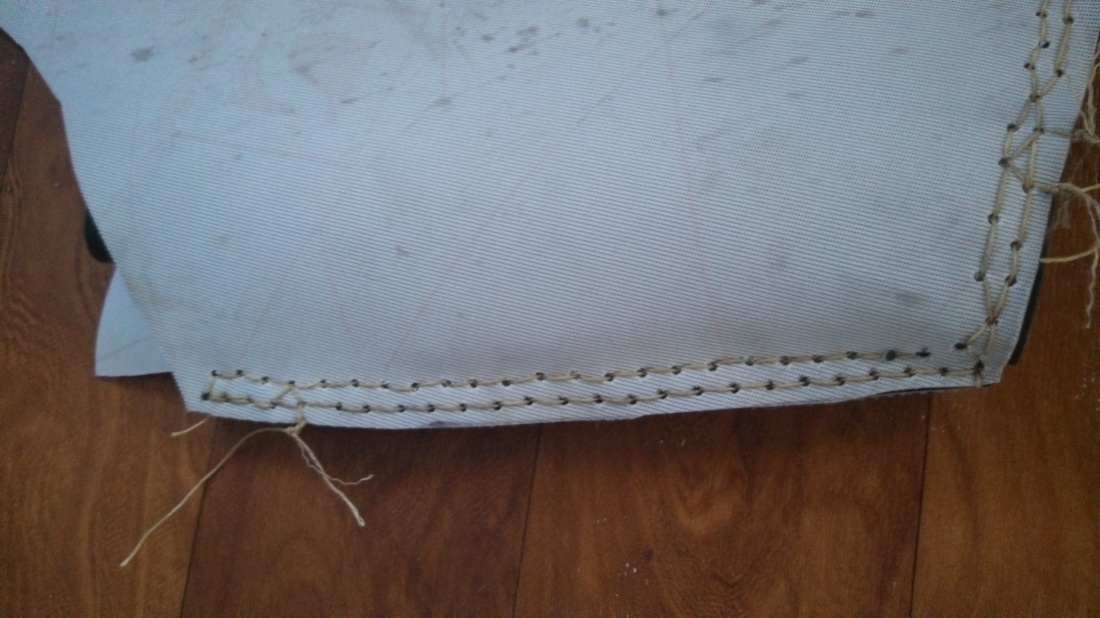
The following two images are a glance at the interior an exterior of the leather armor shell. Time to complete: 3.5 hours
Merrrrr that blurrrrrr.
|
|
Constructing the Plates
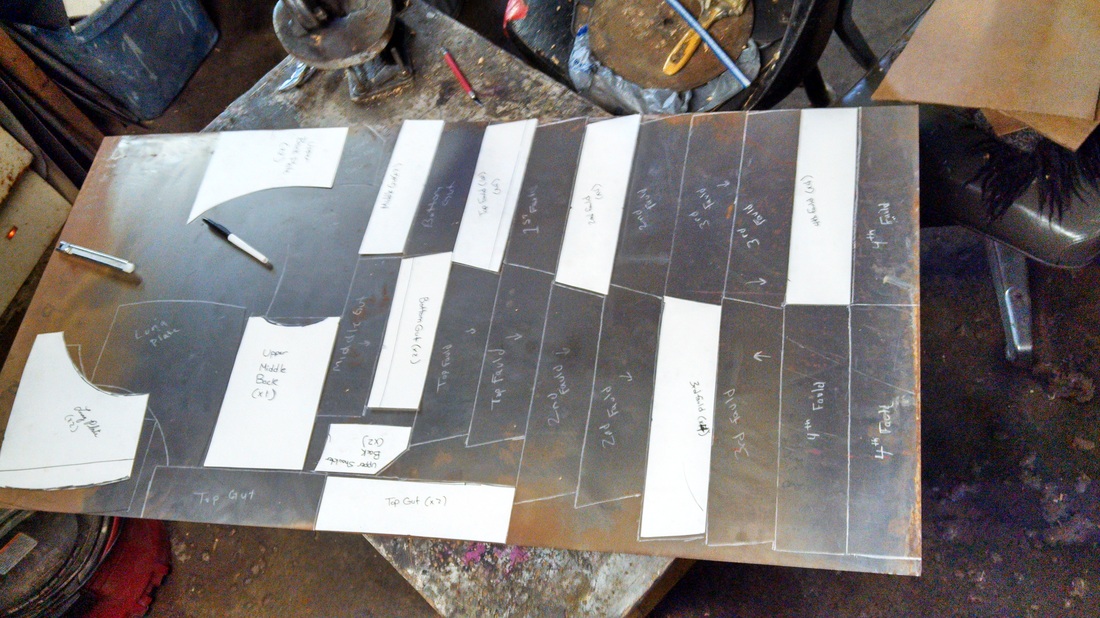
A blank sheet of poster board is required for the metal plate pattern which I picked up for 99 cents. It was later pointed out that one could use recycled cereal box cardboard to serve the same purpose. (I had no hand in physically drawing up the initial patterns. Each pattern design was created by Cliffside Armory on the spot.)
A blank sheet of poster board is required for the metal plate pattern which I picked up for 99 cents. It was later pointed out that one could use recycled cereal box cardboard to serve the same purpose. (I had no hand in physically drawing up the initial patterns. Each pattern design was created by Cliffside Armory on the spot.)

With a ruler and prior COP pattern knowledge, a paper pattern was drawn up, named, and tagged with the number of corresponding plates required for each pattern piece. Pattern pieces would include Faulds 1-4: 4 plates each, Top, Mid, and Bottom Gut: 2 plates each, 2 Upper Back Shoulder plates, 2 Lung plates, 2 Upper Back plates, and one Middle Back plate. Time to complete: 45mins

After each pattern piece was drawn out, the game of two-dimensional pattern Tetris began. The goal here is to leave the smallest amount of scrap metal as possible and have your plates share seams to decrease cutting time. The pattern was drawn out with a chalk pen, as the oil and grit from the metal surface can disable a marker quite quickly I am told.
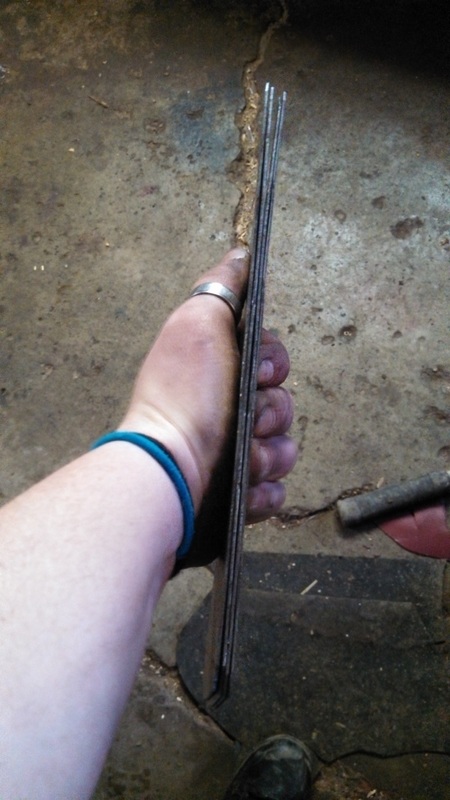
Next each plate was cut out using the pictured Throat-less Beverly Shear. This device is designed with a curved blade that allows for smoother more fluid curves.

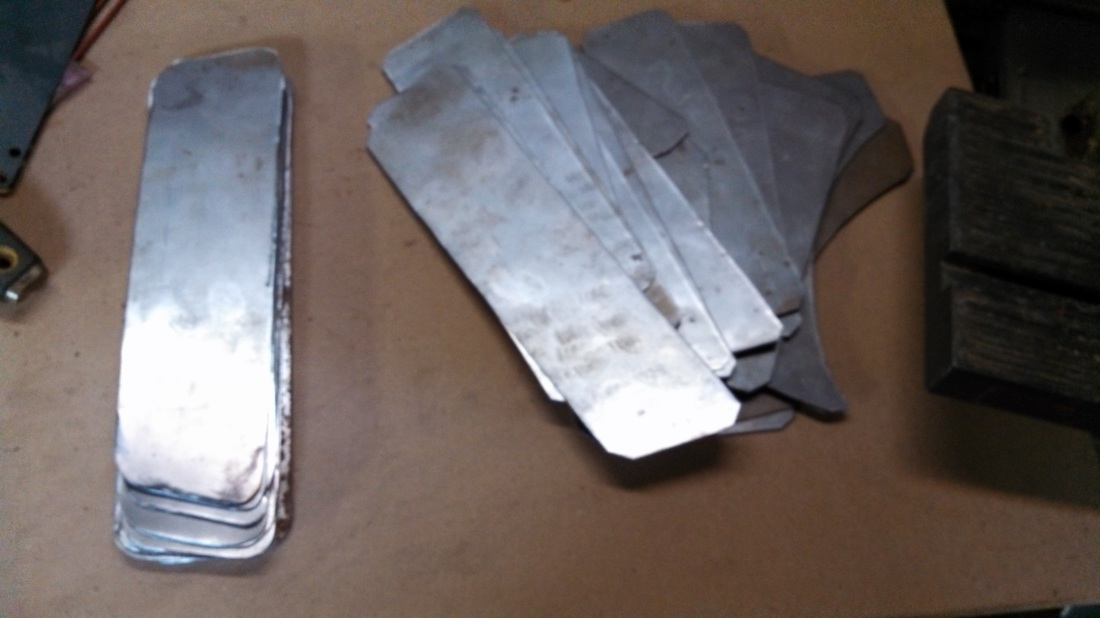
For those of you still following who didn’t do the quick math above: so far this coat has 29 plates. Therefore, any step listed after this description needs to be performed on all additional plates.
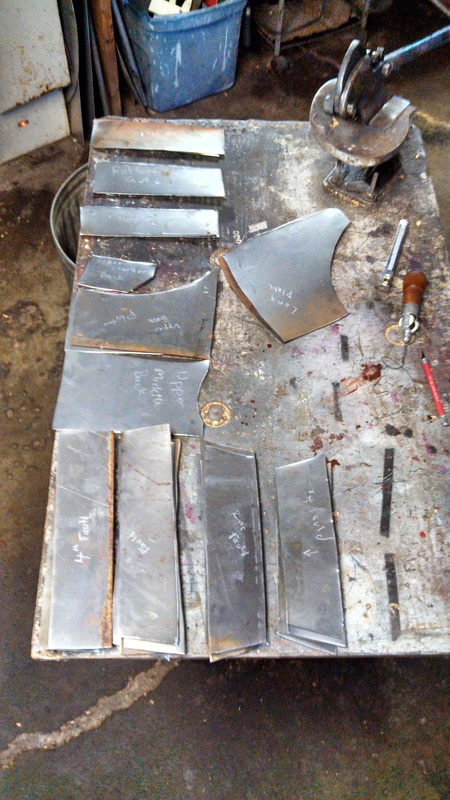
To speed up the edge rounding step ahead, every plate corner needed to be clipped at a 45. The term is chamfer, for those who want a drafting reference. Time to make all metal cuts: 1 hour 20 minutes.
A moment was taken here to appreciate the creation process. So far it has been a fantastically dirty, time consuming task that requires physical endurance, force, and finesse to complete. All was going to schedule.
The metal shearing process leaves the plates warped and sharp in certain areas.
Working with a rawhide mallet, the plates received a pounding on all edges from both sides until each plate lay flat.
It was necessary to flip each plate over multiple times to work different angles to aid in the flattening process. I am slowly training to become ambidextrous, and made sure to pound with both my left and right hands. This also evens out the load on the biceps.

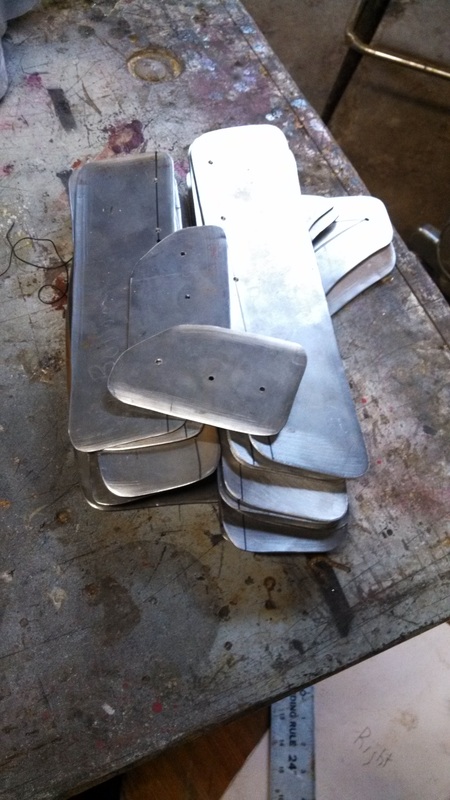
An after photo reconfirming flatness on one set of fauld plates. Only 25 more plates to pound on this session. Time to complete: 1 hour 45 mins
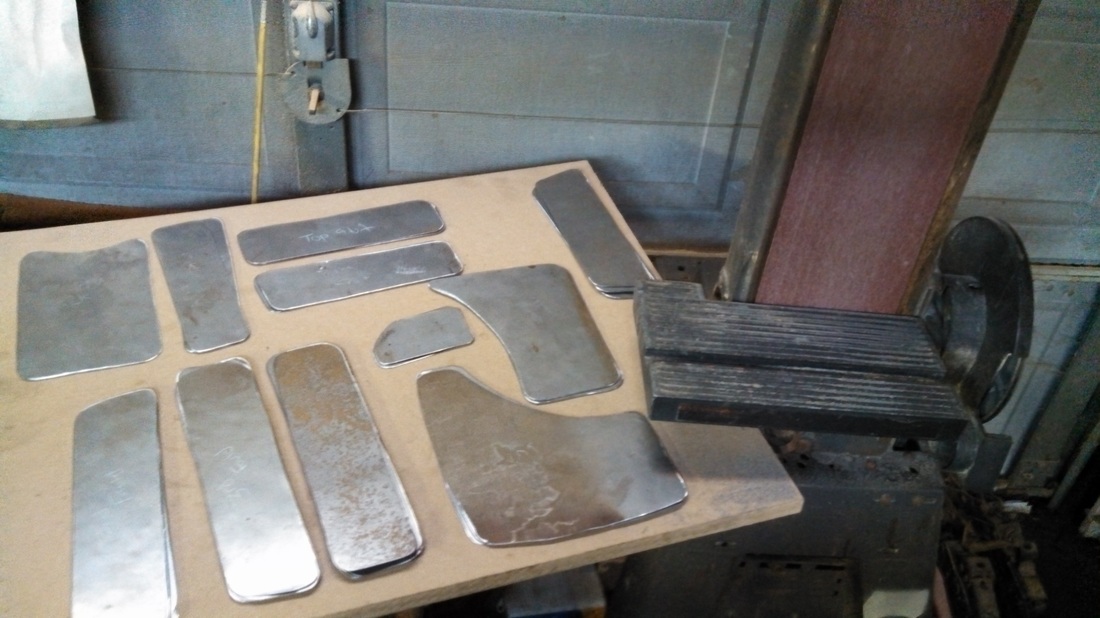
When the plates lay flat, a vertical belt sander was used to round each corner edge while any additional imperfections were ground off. In addition the perimeter edge itself is ground down, but not too far, else you’ll have a plate shaped knife.
This is the part of the project that requires finesse. A balance needs to be found between the amount of pressure to apply on the plate edge, which in turn applies pressure to the belt sander. Too much pressure and the plate will skip out of your hands and slam downward, not enough pressure and nothing is getting accomplished. Safety glasses/goggles, a breathing mask, and ear plugs are suggested for the entire process to guard against airborne metal flecks. Protective gloves are also suggested to protect your knuckles from the rotating belt sander and the resulting grime. Time to complete: 1 Hour 15 minutes
And just when you think the sanding process is complete, think again. Each plate now requires a personal touch. With a fine-grained sanding block, take the time to smooth each edge of all plates to a soft, glossy finish. To test smoothness, you should be willing and able to rub the plate on your face without worry. This ensures the plate does not puncture the exterior of the coat or accidentally stab you in the body. Time to complete: 45 minutes
And just when you think the sanding process is complete, think again. Each plate now requires a personal touch. With a fine-grained sanding block, take the time to smooth each edge of all plates to a soft, glossy finish. To test smoothness, you should be willing and able to rub the plate on your face without worry. This ensures the plate does not puncture the exterior of the coat or accidentally stab you in the body. Time to complete: 45 minutes
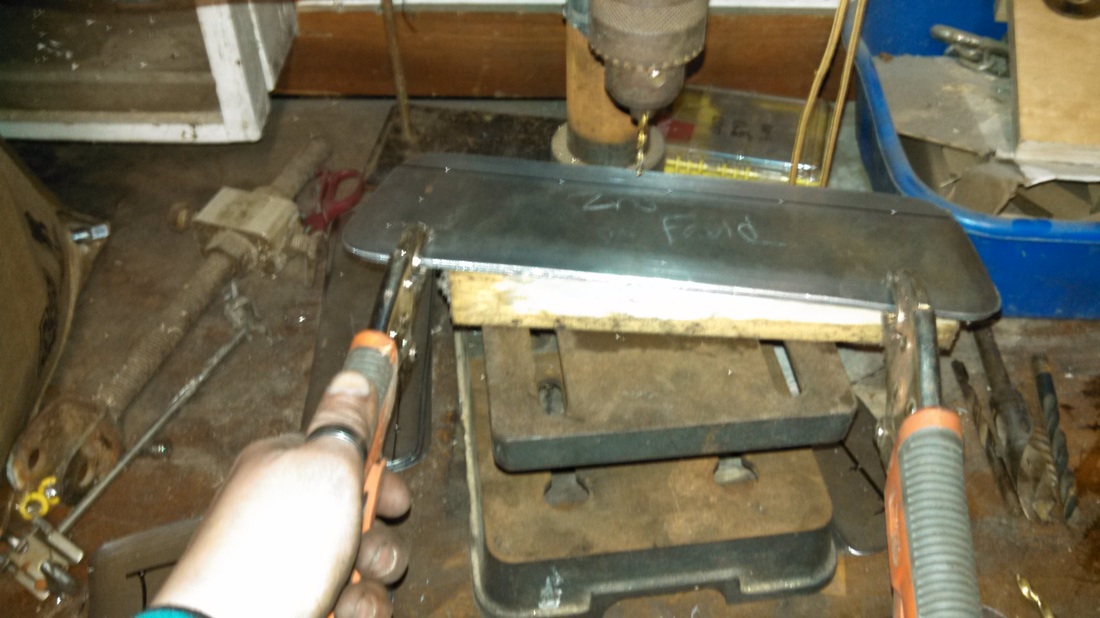
With a ruler and a sharpie, measure the spacing where the rivet holes will be drilled. This should ideally be placed 3/8” from the top of each fauld and gut plate, on the center line for the chest and shoulder pieces, while offset an inch on all sides of the back plates and the curved side of both lung plates.

Similar plates can be stacked four at a time with vice grips, while a center punch is used to hammer an indentation into the potential rivet hole. This aids the drill press bit in catching and drilling out the metal. Each plate will have a resulting burr that needs to be sanded off with the belt sander on the underside of the pressed surface. Once again, back to the sanding stone. Time to complete: 20 minutes
However, once this final sanding task is complete, voila! Plates for the coat have been created.
This concludes the second work shop session. The remainder of the project will be posted upon completion. Next shop date set for 3-7-14.